Why the Hatch Seal HAD to Fail
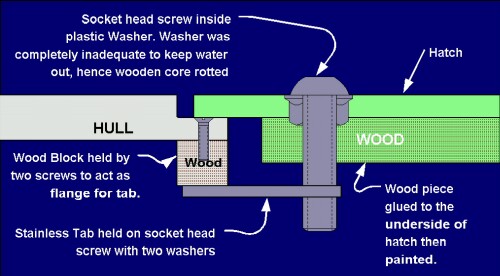
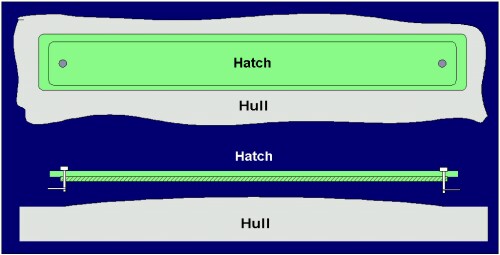
Let's have a look at how this hatch was supposed to seal. In the sketch blow you can see a section of the hatch as it interfaces with the hull. Two such bolt combinations hold the hatch in place (see second sketch).

A cross section of one edge of the hatch and the hull surface joint. Note the absence of a real seal and how water can puddle in the groove between the hull and the hatch. Capillary action will suck water right into the boat if gravity won't do it for you. The hole through the socket section led to general deterioration of the wood backing due to water ingress. However, the majority of the water leaked past the lip seal between the hull and the hatch.
The hull arcs away from the center - the hatch does not. This sort of mismatch will lead to leakage somewhere along the perimeter - particularly if you only use two dogs to keep the hatch shut! A "real" seal would have been too thick to allow a flush installation of the hatch.

Note how the hull curvature - about 1/8" from the midpoint to the edge - and the straight hatch cover make for an interesting fit. Prout did not include seals sufficient to seal the gap. The large perimeter, the fastening method, and the gap between the hatch and the hull almost guarantee rain inside the rear compartment. There is relatively little you can do about the perimeter. Either the hole is large enough to accommodate the hardware you want to install, or it is not.
However, intelligent hatch design minimizes leakage by coming up with an adequate seal design or draining any water that enters through the perimeter. Two flimsy allen heads with tabs are all that stands between a mismatched hatch and hull? I have yet to encounter a hatch design meant for flush installation that did not include several dogs around the perimeter. For that matter, hatches this large tend to be made of non flexible materials like Aluminum, etc. Perhaps the stiffness is required?
While we tried a number of sealing materials, we eventually gave up. Somewhat reliable sealing methods exist (polysulfide comes to mind) but they tend to be very hard to remove. Access to the heater is important and it should not require a razor knife. Prout must have been quite confident about its sealing capabilities (or more likely did not care) since the rear hull compartment had no means to pump it dry. After our gel-cracking experience in winter storage (as a result of 2 feet of water accumulating in one hull) we installed hoses to suck the rear compartment dry (see the water leaks in the rear of the boat page for more on this).
Our design objectives for this hatch were as follows:
- Do not reduce hatch opening
- Keep flush installation of hatch cover relative to boat surface around it
- Reliably drain any water that enters hatch
- Do not interfere with the installation or removal of traveler track or its screws
- Not weaken existing structure in any way.
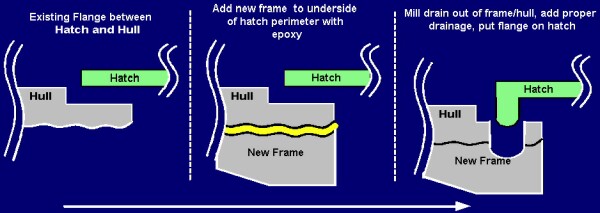
We decided to thicken the fiberglass section under the hatch seal to 1" so we could rout out a ½" wide, ¾" deep groove with built-in drains. The heater hatch will be retrofitted with some lips to create a loose labyrinth seal. The drains feed into the lines that exit from the bilge pumps, allowing easy and certain drainage. If we were really paranoid, we'd install some flappers on the thru-hulls. However, the underside of the deck is 3 feet above the mean water level and it is doubtful that any water would ever make it up there.

Our solution was to take a plaster cast of the underside around the hatch perimeter, to create a new frame from that cast, to epoxy that frame to the hull, and to mill a new drain around the hull perimeter of the hatch. The milled groove would have built-in drainage and the hatch cover would be retrofitted with a flange to create a rudimentary labyrinth seal. The plaster did not work out, so we made a mold out of polyester instead.
Best Estimate of Time Required:
| Previous attempts to seal hatch (efforts over 5 years) | 8 hours |
|---|---|
| Analyze hatch design, brainstorm for solutions, select solution | 4 hours |
| Total | 12 hours |
|---|


