

Dealing with Water Inflows
The water leaking into the rearmost compartment of our Prout Escale Catamaran had three principal sources: The heater hatch, the inspection ports over the rudders, and the shower wand on the rear starboard platform.
None sealed with respect to the elements. With the heater hatch, Prout Catamarans attempted to create a hatch that seals a curved surface with no provisions for drainage - a flat on flat seal. While this must have reduced their construction costs by a minuscule amount (about $15 if you factor in adequate drainage) it also ensured that the hatch would always leak. This led to a two year life of the old furnace. Worse, one winter we had enough water in the port pontoon that the typical winter frost caused the gel coat to split a foot above the waterline.
 Much like the holding tank, the shower wand is a "afterthought" thrown onto our boat.
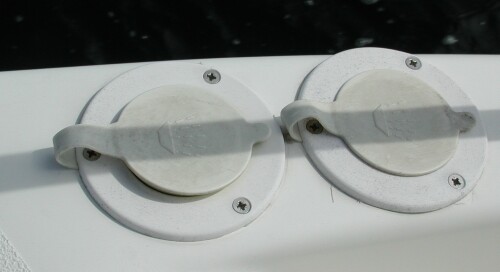
From what I can tell, they are meant to be installed in a surface that is drained below - such as the combing inside a cockpit. Thus, only in self-scuppering areas such as the rear deck of a powerboat is a horizontal installation sensible. In our case, the shower wand is ideally situated to hose down swimmers - but the hole for the wand also allows water into the rear starboard "crash compartment". Furthermore, the location of the cut-outs is ideal to catch water cascading down the length of the considerable deck. The cover flaps for the shower are inadequate to keep water out.
The "controller" knob (to the left) is pretty watertight and always full of freshwater/algae, while the wand (under the right flap) stays dry because the hole in the bottom allows all the water to flow into the rear pontoon.
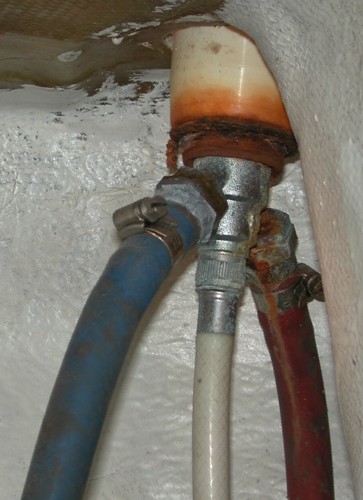
In the picture to the left, you can see the underside of the shower-wand installation. The white hose is the "mixed" water going to the wand itself, while the valve is in the middle. Evidently, a slow leak has allowed some surface water to trickle in and corrode the fastening nut.
Worse, the actual wand hose (white) has a tendency to wrap itself around the rudder-sensor. Using some zip-ties, I was able to restrain it from interering as much with the rudder rotary encoder as it usually likes to.
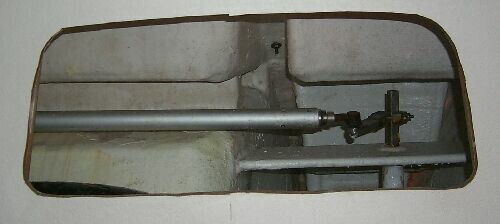
A view aft from inside the master bedroom of our Owners Layout Escale. Usually, a bathtub shaped opaque bookshelf sits in this cutout. The reason the walls in the rearmost compartment are so white is that we scrubbed them down with scrapers, acetone and then refinished them with white epoxy paint. As delivered, no easily accessible inspection hatches existed.
Due to the way Prout Catamarans installed the shower wand and heater hatch, a lot of water entered this compartment. The two inspection ports over the rudder-posts (in the rear stairwell) also leaked and were replaced. In the Furnace Section of the web site I describe how we eliminated further water ingress via the heater hatch.
Under these conditions, the water accumulated in the two rear pontoons and then began to seep forward. Is a watertight bulkhead between the rear crash compartment and the living spaces too much to ask for? Consider the typical installation of twin engines under the rear berths. Any water seeping forward would cause them to be flooded. From what we can tell, Prout Catamarans' fiber-glassing job consisted of tabbing with up to 3" of fiberglass over the plywood structure and painting the rest with a plastic paint. This mildewing paint was so badly catalyzed that it is falling off in big chunks throughout the boat.
We encountered similar conditions in the anchor and fender lockers where balsa/airex bulkheads were also merely tabbed in place and painted instead of being covered with even one layer of fiberglass.
 Since neither pontoon in the rear compartment of our Prout Catamarans Escale had means to remove water, we also installed a set of drains by inserting a copper "T" into the end of a hose that was plumbed into our existing bilge pumping system. Using two Y-switches made of Marelon, we can switch from pumping the two rear bilges in the boat (only melted ice-chest water in the port side) to pumping the two rear pontoons dry.
There are few things as destructive as fresh water continuously seeping through plywood. I just hope that the walls will not suffer from dry-rot. Furthermore, we took the time to fiberglass the bulkheads in this area to prevent further water seepage should a leak spring again. The fiberglass bulkhead cover rises to about 30" off the floor. The epoxy set well, and with generous tabbing down the hull surfaces, this extra layer of fiberglass should be a good water barrier.
We have also improved the ventilation in the compartment so the resultant dry conditions will hopefully prevent a resurgence of mold (yuck!). Cleaning and painting these compartments presented a unique challenge since the space was so confined and the solvents and paints were aggressive. We opted to use a full respirator, Tyvek suits, etc. to protect ourselves. Once we detected a whiff of solvent it was time to take a break, exchange cartridges. Though hot and uncomfortable, at least we didn't suffer from headaches and other symptoms of chemical poisoning.
Thus, another weekend spent doing nothing but dealing with sloppy construction.
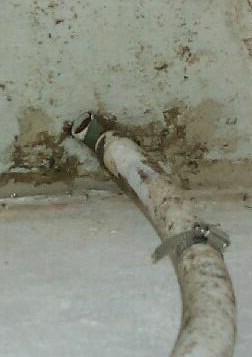
Here you can see the floor to the left and the rear bulkhead to the right. The bilge hose snakes down from above and ends in a "T". Its usefulness is waning as the repairs now allows this space to be bone dry.
Best Estimate of Time Spent Fixing Companionway Defects:
| Improve resistance of current water wand to water ingress | TBD |
|---|---|
| Replace two rear rudderstock portholes | 6 hours |
| Retrofit hose, 2-way selector, attach | 4 hours |
| Clean out compartment, remove falling paint, prep w/acetone | 4 hours |
| Retrofit fiberglass layer on top of wood bulkhead, glue in place w/epoxy | 6 hours |
| Paint 2 layers of epoxy paint | 4 hours |
| Total | 24 hours |
|---|