Wrestling with Wiring
Common Problems
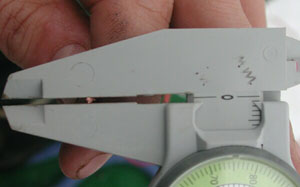
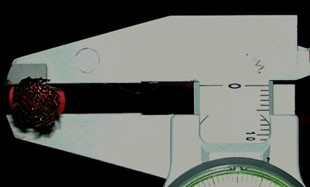
Here is a graphic illustration of the two typical wire sizes we found on our Prout Escale. On the left a common 18AWG conductor (1mm untinned stranded copper). The main buses (battery to Link Box for example) consisted of 6mm untinned, stranded wiring (about 2AWG). Either type of wiring was used in situations where it was inappropriate:
- The 6mm wiring was used for the main buses even though it would have voltage drops well in excess of the 5% advocated by the ABYC. Furthermore, the use of conductors in corrosive environments such as a battery box filled with flooded batteries requires careful sealing. Since the sealing jobs on our open ended battery connections consisted of but a few wraps of electrical tape, our conductors were soon stiff and brittle with corrosion.
- Similarly, the 18AWG wire used most commonly throughout the boat was also untinned and unsealed at the ends. These wires were used for everything from lighting up the mast lights (where 18AWG simply will NOT do) to supplying power to various electric and electronic devices. Not that 18AWG can carry all that much current, as even 105 deg C rated insulated wires are rated for 12 amperes and no more.
Since we aspired to have an as ABYC compliant boat as possible, there was a lot of wiring that had to be removed and/or replaced. Needless to say, this is a time-consuming process, particularly when conduits are stuffed, wires all have the same color, are zip-tied to each other, etc.
Spring 2001 update:
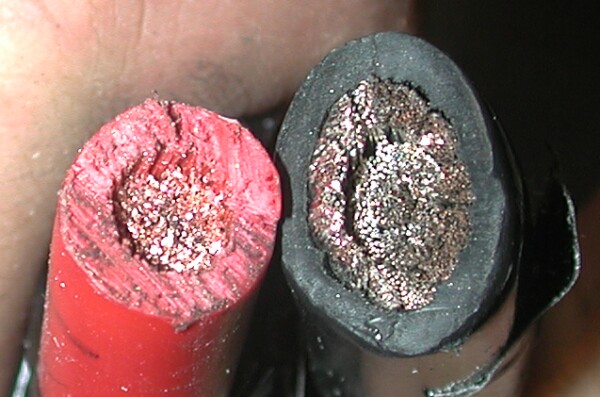
All primary conductors on board have been replaced by 1/0 wiring or larger. Voltage drop along the primary circuits should be minimal now and fall well within the 5% loss ABYC rule for circuit breaker panel supply wiring. Just to give you an idea of the size difference between the conductors mandated by equipment manufacturers and ABYC versus what Prout Catamarans installed, I took this picture. Note how you can easily fit the Prout Catamarans conductor into the core of the Ancor wire we replaced it with. Naturally, the replacements are not only tinned but also have sealed lugs and heat-shrink insulation.
See the image below for half of the wire removed during the Spring 2001 cleanup. More will follow as we follow conductors to their destinations and replace them also. The idea is to create localized bus-bars for lights and power for each quarter of the ship and then have one larger conductor supply the common power source. In fact, were I to build a boat of this size, I'd probably advocate distributed panels throughout.
Distributing panels reduces wiring complexity as one does not end up with hundreds of wires snaking to the same distribution point. A few large conductors suffice to supply sub-panels. Adding more equipment later is eased by the proximity of a sub-panel while the large conductors one should use to supply such panels will ensure minimal voltage drop. I'm willing to bet an ice-cream sundae that the weight of one "big" pair of supply conductors plus local wiring is less than the multitude of fat conductors you'd otherwise have to use to power distant needs.
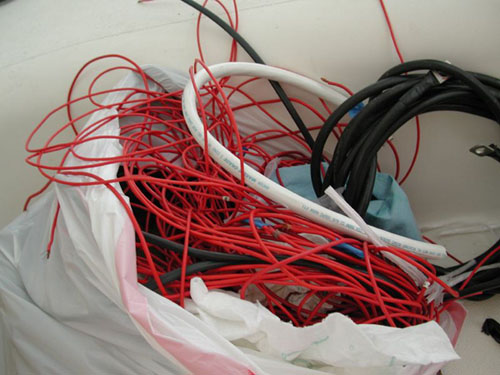
In the picture above, you can see how much 18AWG wiring we'd remove in a given weekend. However, once we decided to go after the pitiful wiring in the electrical closet, the volume of unfit wiring being ripped out of the boat escalated significantly.
Wrestling with Spaghetti
The worst wiring nightmare greeted us in the main electrical closet next to the companionway. Here, the construction techniques that Prout uses came back to haunt us.
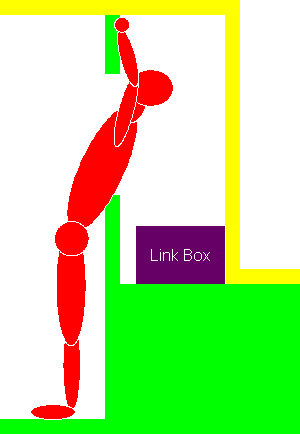
Since the upper hull (yellow) and the lower hull (green) are not joined until the boat is virtually built, there wasn't a convenient place for the Prout electricians to make wire splices and connections but the back wall of the electrical closet. (presumably, they'd be standing on the green sole).
The crude mannequin at left indicates just how easy it was to work on these connections that governed everything from the mast connections to distributing power to the rear half of the boat. Thus, every wire used in the rear of the boat came to this (crowded and unservicable) location. Here they'd be interfaced with the wires orignating from the conduit below via Euro-style screw-down blocks.Naturally, such blocks offer no protection to the wires in use, to the detriment of the stranded copper conductors used by Prout Catamarabs.
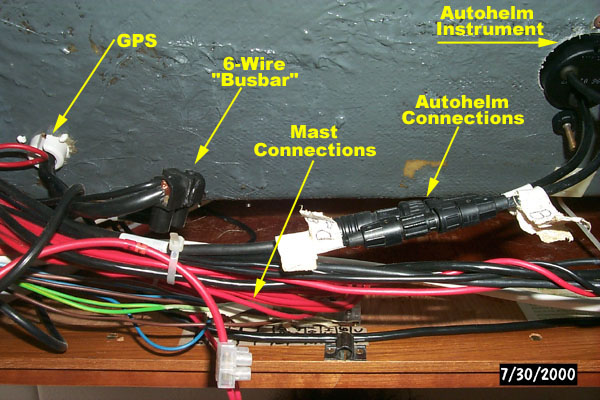
Below is but a small section of the wiring that greeted us above the cutout to the electrical closet. The now famous 6-wire "busbar" can be seen near the center and to the left. Evidently, many of the mast wiring connections (obscured by wires) were made near the center of the cutout - note the same green wires here that you can see in the Mast wiring picture below. So, these conductors were supposed to provide 5% voltage drop for our navigation aids as ABYC mandates?
More Spaghetti-Wrestling below
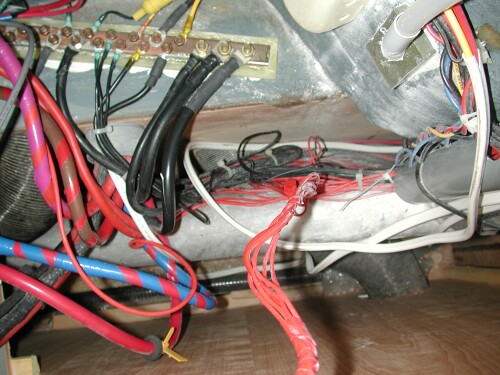
Here we are again in the electrical closet, this time peering down. To the left is the Link Box - that is where all the positive (red) conductors are running to. So which of the wires here has been supported every 18" as mandated by ABYC? Also note the huge number of roughly bundled ground and positive conductors jostling for the opportunity to run up the conduit next to the mast support (right side of picture). No visible chafe protection, and the 5 wires reaching up in the front used to be attached to 10A-63A circuit breakers. Short of cutting open bulkheads, there was no way to ensure the type of chafe protection that unsheated wires like this usually call for.
Given the inadequate conductors used in the boat, the lack of chafe protection, the impossible mounting location inside the electrical closet of un-numbered, unidentified connections, we did what any intelligent human would have done a long time ago: Replace the entire secondary layer of Prout-installed wiring. The mast wiring we'd purchased gave us the inspiration to run sheathed wiring to the electrical closet and to redistribute from there. The picture above doesn't indicate the whole wire mess we started with, as a huge number of wires had been removed already.
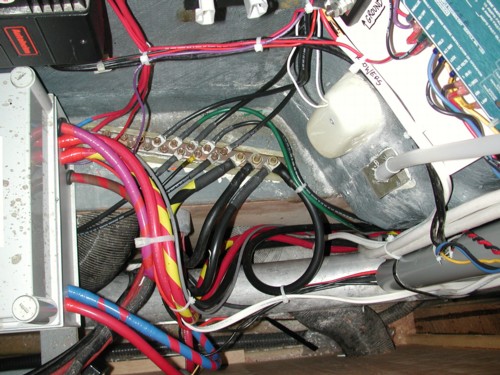
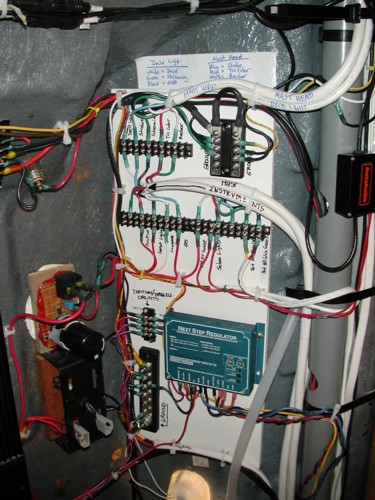 Note the absence of loose wiring in the pictures above and to the left. While we could not avoid having some large conductors potentially slide around, the myriad of individual conductors has been bundled into three multi-conductor sheathed assemblies (rising from below at the right side of the picture above, and entering from the right in the picture to the left).
In order to make the wiring more accessible, we glued a ½" thick plywood board to the inside cockpit wall. Thus, we could install proper distribution blocks with connections for ring terminals. The only downside to the sheathed wires is that their ABYC color codes had to be ignored by me for the most part. If Ancor made more suitable wire assemblies, I'd buy them, honest!
Thus, you'll see black conductors inside the sheathed assembly being used as positive conductors, etc. However, as the sheathed wire assemblies arrive in the electrical closet in one unbroken run and because I plan to indicate such "deviations" on the wiring diagram of the boat it should be pretty simple for someone else to figure out what is going on.
The space that the big white board afforded us to make a myriad of un-cramped and labeled connections. We even have two spare wires! At the very top, I started with the mast navigation light wiring connections. At left of the distribution block is a ground block for the mast wires, the compass light, and the main saloon lights. A 8AWG conductor then runs down to the main grounding block.
Below the mast wiring connections one can find the connections that make the back of the boat work. The instruments, auto-pilot power, etc. are mounted on the left-hand distribution block, while lights, plug power, etc. are found on the right-hand one.
Below the main aft power distribution point, the regulator governs the alternator. To its left is a distribution point for the battery-paralelling solenoid and power from the key switch for the engine. The power from the key-switch is fused with a 5A fuse and turns on the regulator, engages the engine compartment blower control, and illuminates the emergency paralell switch for the battery banks.
Below, a large grounding block bundles many little wires into one large 8AWG conductor that then makes its way to the main grounding strip below. The use of such blocks reduces the thickness of wiring bundles significantly! Naturally, the more wires that run into such ground blocks, the more vigilant one has to be to ensure a good connection to the main ground block. Even 8AWG has ampacity limits!
Another 5-wire assembly was sent to the starboard aft toilet to carry current for the shower pump, the fridge, the lights, the plugs, and the stern navigation light. As with most distribution points, the return consists of a single 8AWG conductor which has more than enough ampacity to deal with five 14AWG conductors. All these 8AWG returns and some larger cousins then find their way to the main grounding block, which can be seen below.
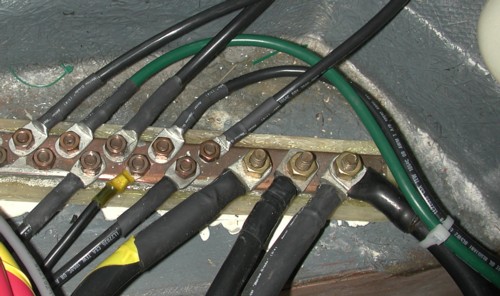
Note the green wire which runs from the lightning protection system. As we continue to ground all exterior metal objects, the number of 8AWG green conductors should increase.
As the picture below demonstrates, the wiring around the engine control panel and autopilot has changed as well. Instead of Euro-style connectors, real ring terminals with heat shrunk insulation ensure that connections are easy to make and to look over (right corner of picture). Also note that while most connections on the block are simply conductor to conductor, a middle pair features a "jumper" which allows part of the distribution block to be turned into a busbar. In our case, it allows three ground wires to use one 10AWG conductor.
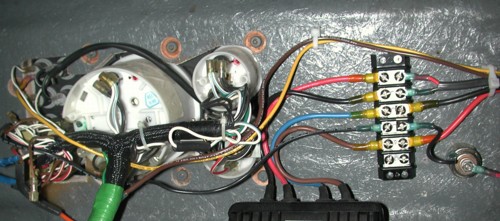
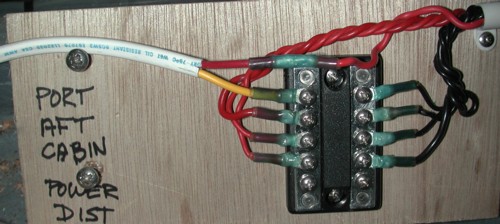
We also discovered that Prout catamarans employees liked to bring all their cabin wiring to one point, then bundle connections. We simply undid their Euro-connectors (which had up to five wires stuck into them), put real terminals on the wires, then mounted everything on standard distribution blocks.
In the picture below, you can see the connections we made for the port aft cabin - three lights, one plug. The ground return wire is not in this picture, the red conductor is interfaced directly with the plug wire. Much the same was repeated elsewhere on board. We don't have a lot of plugs, thus using butt connectors was easier than dedicating a whole new bus with only two connections on it.
Thus, while all secondary circuits are now ABYC compliant and the tertiary circuits have good, reliable connections, much of the original tertiary wiring still remains.
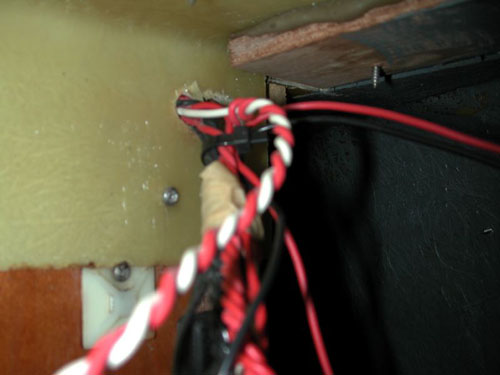
In the somewhat shocking image below is a graphic example of Prout Catamaran wiring quality. Would you trust a boat builder that crudely cuts access holes through which thick electrical wiring bundles are pushed? I'm not sure why this was the most convenient way to wire our Escale, but leaving electrical wires to chafe on top of crudely cut fiberglass is fairly dangerous. Chafe requirements have been spelled out by ABYC for a reason. Naturally, this brain-dead installation will be remedied as soon as possible.
However, if you own or want to buy a Prout, having a look behind the main circuit breaker panel may be a very good idea. Also note the screws sticking through the top and elsewhere - another excellent opportunity to ensure chafe, shorts, etc.
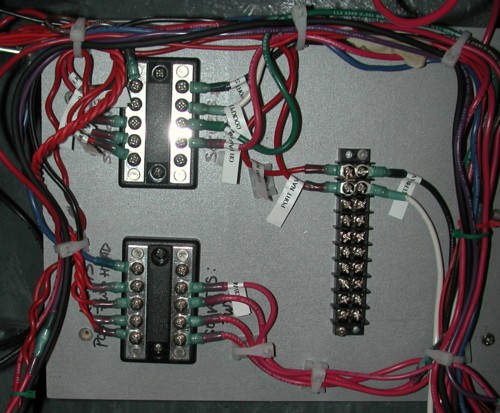
In the following image you can see how we installed a similar distribution point behind the main circuit breaker panel as we did in the electrical closet. Thus, the circuit breakers no longer have to support up to four wires piggy-backed on one fragile tab. While the below wiring bundle is pretty "busy" as well due to the number of connections it has to handle, I assure you that it is much easier to follow than the wiring bundles we started off with.
Imagine several thick bundles of 18AWG wires that then proceed to split in various places. Naturally, the wiring numbering didn't match the wiring diagram, i.e. were totally useless. Instead of numbers, we use a small label-maker to make labels for us. These are much easier to follow than numbers and clearly describe what the function of each wire is.
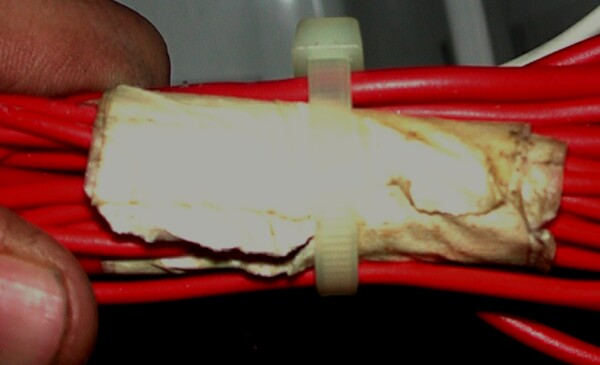
The image below amuses me to no end. I'm not sure if this was but a convenient temporary wiring bundle or if this paper masking tape was actually meant to do something for the wires it encompasses. To the best of my knowledge, ordinary paper masking tape does not qualify as proper insulation for wiring bundles. On the other hand, given some of the other things I have seen in our electrical system, little remains to surprise me when it comes to the oxymoron that Prout Catamarans and quality has become for me.
As I have mentioned in the overview section, the wiring on the boat was poorly annotated, if at all. The wiring diagram only included the positive side of the circuits and only covered the circuits in general. The numbering scheme for the wires was not followed when they were installed into the Escale - my draft electrical plan had to be re-numbered from the ground up since not a single wire had the right bundle number. It made me wonder why Prout bothered to install any numbers on their conductors at all.
Sadly, having a "hound" and "fox" probe (usually used on telephone lines to locate them) is a useful tool on this boat. Furthermore, if you want to be sure that all that untinned copper used as wiring in your Prout will not corrode quickly then replacing all the terminal ends is the least you can do.
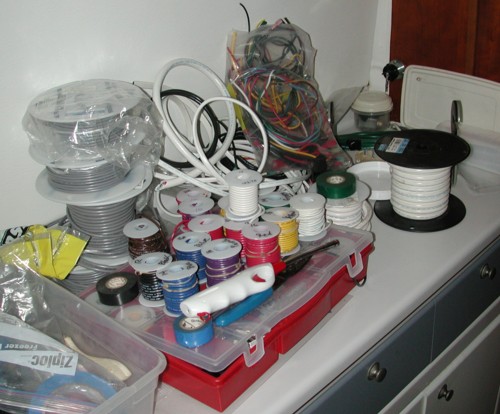
Naturally, all this wiring isn't possible without massive supplies of wire, connectors, etc. I also advocate the use of double-crimping ratchet crimpers that do a better job of crimping connections well. In the end we used two 100ft rolls of "Mast" wire to redo the mast and the electrical connections within the boat.
Best Estimate for Time Required:
Common Conductor Problems:
| Remove 2 AWG OEM house battery cable, replace with 2/0 tinned conductor | 1.5 hours |
|---|---|
| Remove 2 AWG OEM starter battery cable, replace with 2/0 tinned conductor | 1.5 hours |
| Replace 2 AWG OEM ground cable with 2/0 tinned conductor for batteries, starter | 2 hours |
| Replace Windlass wires with 1/0 tinned conductor | 3 hours |
| Replace Main CB supply wires with 1/0 tinned conductor | 2 hours |
Main Circuit-Breaker to Link-Box, Mast Rewiring:
| Remove Link-Box CB status wiring (5x 18 AWG) | 3 hours |
|---|---|
| Install wire mounting plate behind Main CB panel | 2 hours |
| Re-route wiring, simplify connections, install bus-bars behind main CB panel | 16 hours |
| Replace Main CB panel to Mast wiring (5x 14 AWG) | 1 hour |
| Label individual wires | TBD |
Re-wire Electrical Closet
| Create, install new backing boards | 2 hours |
|---|---|
| Install new terminal strips, wire conduits | 1 hour |
| Install wires, make new connections | 20 hours |
| Test | 0.5 hours |
Misc. Wiring around the boat:
| Replace all wires running from Main CB panel to electrical closet with 3 sheathed wire assemblies | 6 hours |
|---|---|
| Pull new conductor, re-wire starboard aft quarter of boat | 16 hours |
| Re-wire lights, plugs of port aft quarter | 4 hours |
| Total | 81.5 hours |
|---|


