


Airport Base Station 2.0 Extended
As you can see in a previous section, the Airport Base Station 2.0 (a.k.a. "Snow" or "White") is a radical departure from the "Graphite" base stations it replaces. While adding an external antenna was initially quite difficult, one would be foolish to underestimate the creativity of computer users and suppliers around the world to come up with solutions.
Several readers have responded with pictures and descriptions on how they did it. All of the credit goes to them and I can't thank them enough for sharing this information with you.
I will show you two ways of doing it, one contributed by James Street, the other by Larry Walsh. Both solutions work, and neither requires permanent modifications. At this point, it might be a good idea to familiarize yourself with what Antennas do. See this Antenna primer so that you know what kind of antenna you need for you application.
These instructions only apply to the "Snow" ABS. You can find instructions on how to extend the range of earlier "Graphite" and later Extreme base stations elsewhere on this site. Please remember: Once you open your ABS, your warranty is void and everything I might inspire you to do is at your risk alone.
Anyway, to open an ABS 2.0, you need a Torx T-8 screw driver and a small phillips screw driver if you want to open the Snow base station completely (usually not necessary). Here is what you should expect to see inside the ABS on this page. First, disconnect all cords from the base station. With the help of the torx screwdriver, you want to work your way up to where you see the round inner shell. Then extract the antenna wire from the underside of the unit (see below).
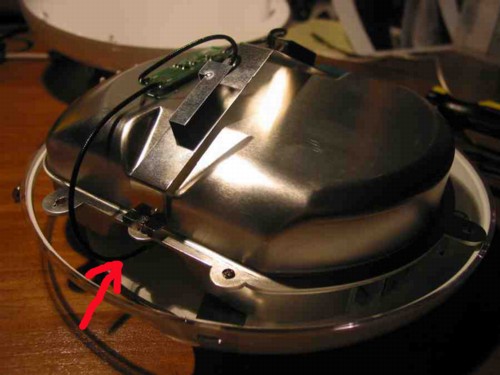
(picture courtesy of Markus Werning)
The antenna wire in "Snow" base stations runs to this board before splitting into two halves to connect to a dipole antenna. Typically, such an antenna has a gain of 2.1dbi. However, it is entirely possible that Apple is also doing some amplification on this board since I seem to see Op-Amps in the signal path. The power to do this would be supplied via the antenna cable (DC current on top of the signal). Click on the picture below to get a better view of the antenna board. Here is also a neat perspective on the possible functions of the antenna boards found in "Snow" base stations.
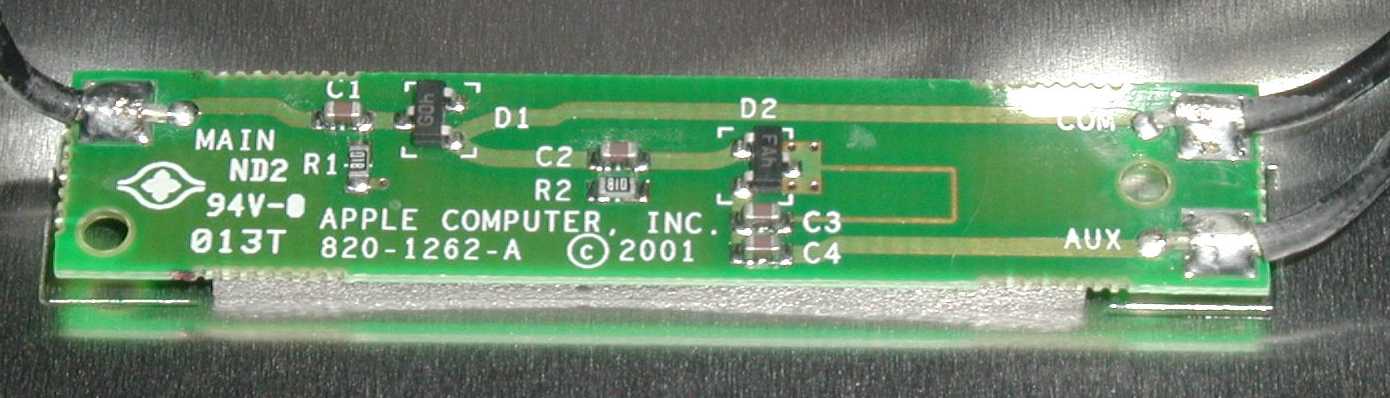
(picture credit: Sascha Großkopf)
Hence the trouble that many folks have had attaching external antennas to "Snow" base stations. Even if the board does not amplify the signal at all, the new antenna must have at least a net gain of 2.1dbi to equal the antenna inside the "Snow" ABS. That pretty much eliminates most pre-fab antennas with MC-Card connectors that have 5 foot long cables (i.e. 2.5db loss there) and a gain of less than 5dbi. One reader reported that the 8dbi gain antenna he attached to the "Snow" ABS only lead to a net 5% improvement in range!
Now this may be an isolated incident. Thus, I'd appreciate feedback from folks who have made the switch and can tell me what difference attaching an external antenna to a "Snow" base station made. Please e-mail me!
In the meantime, I have found one product that looks very promising and that can easily attached to the MC-Card plug found inside the "Snow" ABS. It's called the YDI Max-Ranger antenna and you can buy it at Fab-Corp. The reason it looks promising is that this unit is a Automatic Gain Amplifier and antenna that boosts signal output to 23dbm (i.e. 300mW). Attach the MC-Card plug to your ABS, insert the power supply, and you should be good to go.
Unfortunately, the price is sufficiently high where buying a second ABS is not out of the question... and probably a better idea, if you can wire it up remotely ("Snow" base stations do not support WDS). Due to its 12VDC power supply, the "Snow" ABS easily lends itself to Power-over-Ethernet, a simple $30 device you can buy at Macwireless. With the PoE injector, you only need to run an ethernet wire to where the ABS needs to be - no local electrical outlet is required. Thus, a PoE injector is a great way to optimally place your base station within your house. It works for locations in the basement, attic, or even the garden shed. Just remember to shield the ABS from the elements.
Since I have no experience with the YDI Max-Ranger, I would appreciate any feedback you may have with its use. I'll try and update the pages here ASAP afterwards.
Fab-Corp MC-Card Antenna Plug (picture credit: James Street) To the left, I show a "MC Card" connector. This is what will plug into the "Airport" card found inside the ABS. It is very small and very delicate - so you better be careful to align it right during insertion. The best way described thus far is to insert the plug with the antenna so that the antenna wire does not interfere with the metal enclosure Then, if reassembly of the base station is required, carefully rotate the plug and wire until they are tangential to the outer skin of the metal enclosure (see next picture). Most resellers try to reduce buyer confusion and sell pigtails or antenna kits by the brand that they fit into rather than by technical specification. MC-Card plugs are used in some 802.11b PC-Card wireless LAN adapters by: Avaya, Orinoco, Buffalo, Dell, Entrasys, IBM, Toshiba, Cabletron, Linksys, and others. Read the technical specifications for each card to be sure what external connector (if any) it has. |
MC-Card Antenna Plug Installed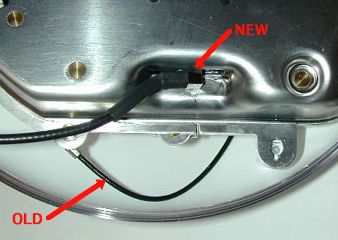 (picture credit: James Street) Some readers had difficulty extracting the OEM antenna plug. A pair of fine pliers might be able to help you get it out. The plastic-covered hole next to the airport antenna hole has no function. In the picture to right, you can see the old and the new antenna cables. While the old OEM cable now hangs loosely below, the new antenna cable has some difficulty dealing with the rather tight location. However, it should fit. |
If you want to re-assemble the "White" Antenna enclosure, now is the time to lead the antenna wire through the bottom shell hole as shown in the picture below (though the picture shows a pigtail with a N-male connector instead of a external antenna).
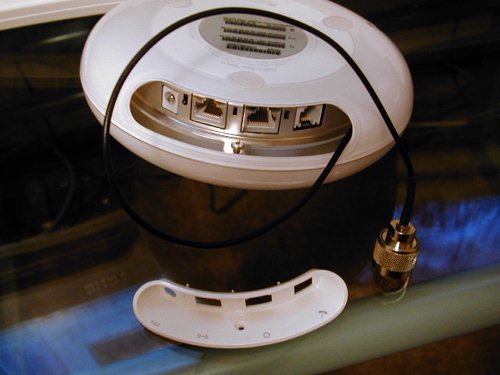
(picture credit: James Street)
To open the kidney-shaped hole, you have to undo yet one more torx-screw. If you'd like to be able to return the ABS to its stock configuration in the future, store the kidney-piece and screw in a safe place. If the big hole bothers your artistic sensibilities, you can easily cut a small cutout into the kidney-shaped plastic to accommodate the antenna wire. However, this leaves permanent scars...
The Pigtail Solution
James Street bought his 19" Pigtail Antenna Cable from www.fab-corp.com. They don't list an exact part number, so look for a 19" pigtail adapter for "Orinoco/Avaya/MC Card" to "N-Male". It should cost about $20.
The N-Male plug on the other end of the pigtail adapter is much larger and it allows you to attach a wide array of antennas. You'll lose 0.7 db of signal if you go with the 12" pigtail, pretty much regardless of brand. Considering the trouble described above with the antenna board, a pigtail connector makes the most sense if you're planning to build a point-to-point network that uses super-high-gain directional antennas.
The installation steps for pigtails are the same as for the antenna kits (see above). The only difference being that you have to screw the antenna pigtail into something.
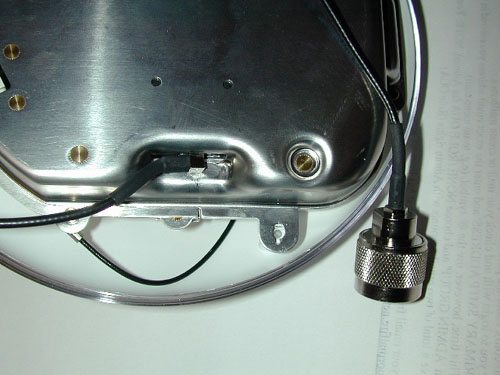
(picture credit: James Street)
This picture shows the plug in place. Note the bending of the wire and the obvious force this must be exerting on the MC Card plug inside the ABS. Be careful not to break it! Also note the much larger N-Male plug to the right. This is what we will screw into a standard Antenna base (a.k.a. N-Female).