

Repairing the Kitchen Sink Drain
While on a cruise in 2004, it became apparent that the kitchen sink was having a lot of trouble draining. Urgh, yet another "project"! Thus, I started to take the kitchen sink drain apart, discovering yet another instance of Prout Catamaran creativity in the face of adversity.
Conceptually, the design on hand was sound. Solid ½" "UPVC" piping picks up water from the three sink outlets, then expels it out the side via a ¾" thru-hull. As usual, Prout elected to install a gate valve prior to the thru-hull. However, I started to groan pretty quickly as I undid the connections...
First, I extracted the drainage system shown below. The three nipples to the right are for the "pots" that are bolted to the kitchen drains (the middle pot is missing). The nipple to the right is a bit longer and attaches the assembly to the thru-hull/gate valve. Do you see anything unusual?
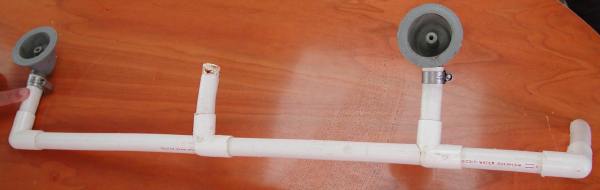
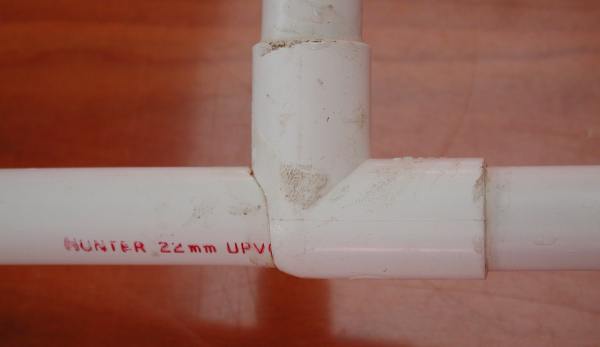
The devil is in the details. Note how the entire assembly relies on nothing more than 90° "L's" to keep things together. Evidently, the installers had run out of "T's" and simply made the L's work by drilling their corners, inserting a drilled piece of straight PVC, and hoping that the rubber cement they applied to the razor-thin joint would hold them together. Well, it didn't... particularly once I attempted to extract the assembly from underneath the sink (gently, I swear!).
I was more than a bit dumfounded that the whole thing had held together as much as it did. On the other hand, the condition of the drain more than explains the traditionally damp conditions under the sink... yet another lesson learned... areas under sinks shouldn't be expected to be damp. Furthermore, I ought to take a close look at replacing all the other kludged water system components before they too attempt to soak the boat from the inside out.
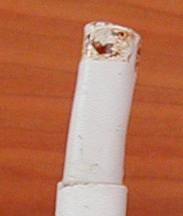
To the right, you can see a bit of deformed PVC that forms the nipple assembly that interfaces with a pot under the sink. The brown mess at the tip are remnants of the rubber cement and rust stains from the "stainless" hose clamp used to make a water-tight joint between the pipe and the pot. How a hose clamp is supposed to work with solid PVC pipe is a bit of a mystery to me. Perhaps if the installers had elected to use a better sealant, the hose clamps would not have been necessary.
Less visible, yet even more creative was the usage of hot temperatures to deform the PVC pipe to make it conform itself to the varying heights of the "pots" as installed. Since the three sinks all drain at different heights, I can see how the installer would have had some difficulty properly assembling the whole drain ahead of time. On the other hand, this does not excuse their sloppy creation, it simply explains it.
Since I did not have all the requisite materials on board to effect a proper repair immediately, I simply cleared the blockage (old matches and whatnot) and reassembled the mess into place (using 3M sealant to reattach the drain sections). Soon, this foolish assembly will be replaced by a proper drain...
The new drain will feature properly glued solid CPVC solid sections that should allow the sinks to drains with aplomb, exiting via a ball valve thru the extant thru-hull. Stay tuned!
Time Required to Fix the Kitchen Drain:
| Pre-assemble new drain | TBD | Install new drain | TBD |
|---|
| Total | TBD |
|---|