Preventing the Cockpit from Draining onto the Engine
The engine compartment on our Prout Escale is in the nacelle between the two hulls. Prout Catamarans attempted to keep the engine dry by installing a U-shaped network of ½" copper tubing to drain water from the groove under the engine hatch. As noted elsewhere, this is the only hatch on board that was "drained". Elsewhere, hatches were expected to leak into the boat.
Incredibly, the employees of Prout Catamarans also installed a ¾" drain about 10" behind the hatch that exited right onto the hydraulic pumps! Thus while 5 pathetic holes attempted to drain off any water that entered the engine hatch groove, the much larger cockpit drain was draining into the engine compartment. Why would Prout Catamarans drain cockpit water into a vital compartment instead of overboard? Furthermore, why would Prout Catamarans not build adequate drainage into such compartments? The answer, of course, can only be found in Canvey Island, England because I have no clue.
Here is a cross section of our engine compartment on our Prout Escale during that fateful winter flooding. If you're wondering about the 8 degree angle of the compartment, that is due to the ramp the boat is stored on in the winter.
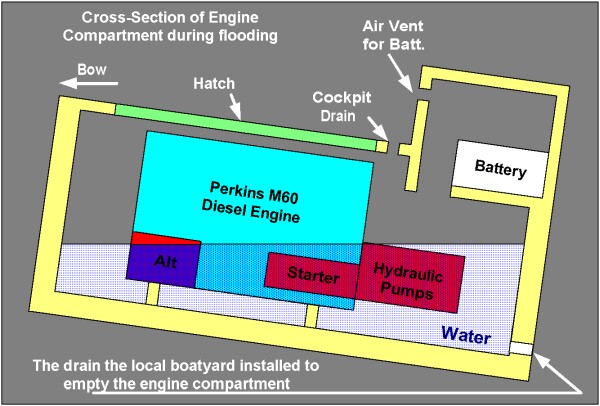
With the flood we discovered that the engine compartment on our Escale had no drains built into it. When the local boat yard found all that water in our boat during spring recommissioning, they drilled a hole and retrofitted a rudimentary drain into the back of the engine compartment to dry it out. However, a lot of damage was already done.
A hydraulic pump casing was cracked due to water ingress and subsequent ice expansion. The hydraulic system had become contaminated with water and had to be drained and cleaned. The cracked pump was a total loss, the other one had to be shipped to Rexroth to be rebuilt. The alternator could be rebuilt but the far more expensive starter was totalled and had to be replaced. The pumps alone took 2.5 months to get back to us (there goes the summer cruising season).
Had the cockpit been drained overboard instead of into the engine compartment, over USD 5,000 damage would have been prevented. Only blind luck prevented the engine from being flooded internally, as the water stopped 1/2 inch short of the air intakes (the water ran into other areas of the ship via the pass-thru holes for the hydraulic system). We always thought it was the hatch that leaked until we realized that nothing was attached to the cockpit drain. Never assume anything! The employees at Prout Catamarans can be more sloppy that you'd ever imagine.
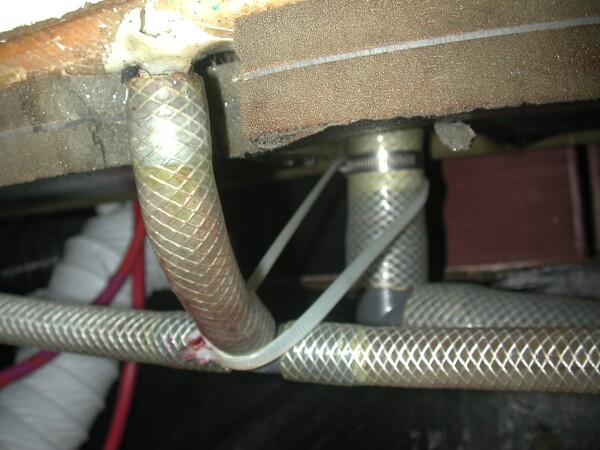
Here is a picture of the drain system we installed in the back of our Prout Escale. In the front you can see a retro fitted drain in one of the grooves surrounding the engine compartment hatch. The two reinforced hoses running to either side connect to the hatch drainage system. All three drain aft-ward where the main cockpit drain joins them and empties out the rear via a new thru-hull.
And if you are wondering why we did not notice why the cockpit was draining into the engine compartment, please bear in mind how much of the engine hatch room is filled with the Perkins and how inaccessible the underside of the cockpit really is. The raw water pump blocks any direct observation of the drain - the raw water pump almost touches the roof of the compartment and the drain is positioned another 10 inches aft-ward of the pump.
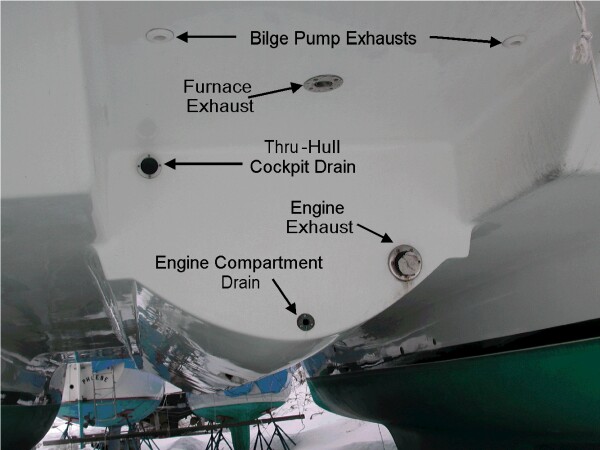
The back of the engine nacelle between the hulls. Note the retrofitted engine compartment drain and the thru-hull for the cockpit.
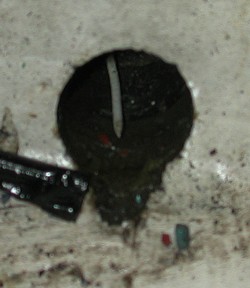 However, the engine compartment drain will have to be redone, as the current hole is unfinished. This should be pretty easy given that the engine is no longer in the way of things. Note the multiple layers of wood inside the hole and the zip tie trying to make an escape. Bad zip-tie!
Low quantity day-to-day bilge pumping (if required) will be handled by a small hand pump and a filtration system that retains all hydrocarbons while allowing water to pass. Thus, only catastrophic failures of the engine could lead to environmental degradation. Two additional 1" drains will eventually be incorporated into the hatch that covers the diesel gas tank. Thus, we'll have three "real" drains in the cockpit in addition to the marginal groove drainage under the two hatches.
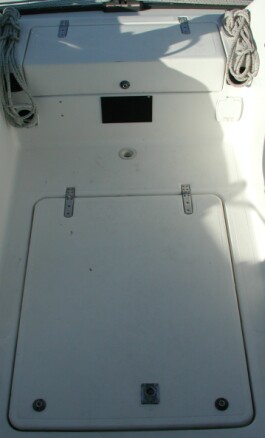 The area around the engine cover. Note the main cockpit drain behind the cover, the battery hatch and the Whale pumps to empty the bilges and pontoons. |
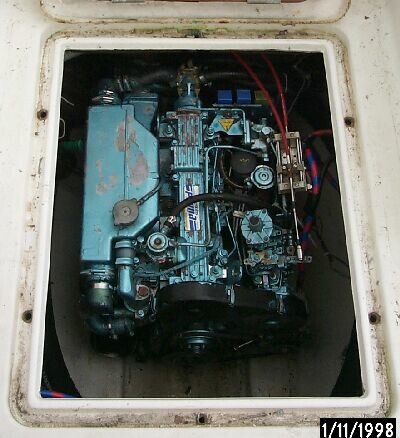 Our Perkins Prima M60 engine: Shoehorned and happy. The groove under that hatch now contains 6 drain ports, with the retrofit rear one being a ¾" diameter. All ports can now drain to the front and rear. Some color coded wire for the alternator is visible. Also note the looping exhaust line around the bottom. |
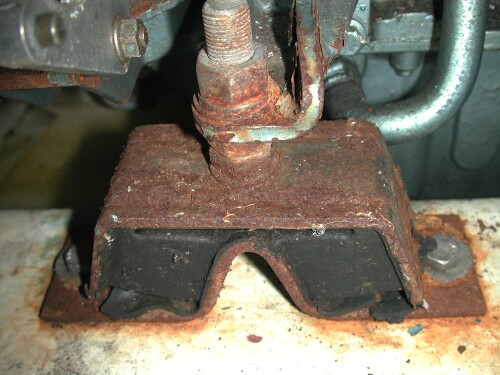
The legacy of water ingress can be witnessed on our engine mounts which are pretty rusty. The bolts were installed after the flood and covered in grease. Hence their good condition. Below is a picture of what the mounting location looked like underneath the engine mount in the above picture
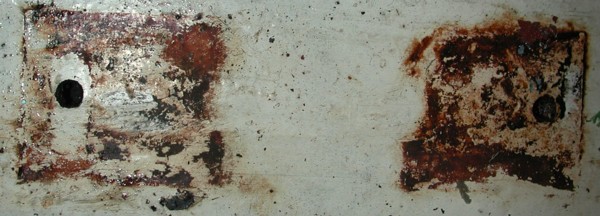
Here we have a close-up of one engine mounting location. Under the fiberglass, a thick plate with two tapped holes beckons. We are currently replacing the engine mounts and hope to find a waterproof solution to keep the core dry in the future, even if the compartment floods.
The replacement engine mounts we bought in 2002 were a bit too stiff - they made the boat shake! We replaced them with T75 and T100 mounts for Yanmar engines, which work great.
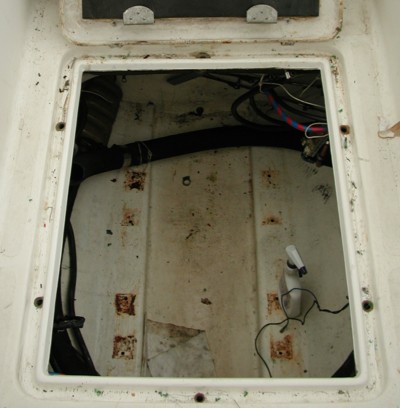 Here we have the engine compartment after the engine was extracted and some heavy duty cleaning took place to remove sludge, etc. The muffler and the exhaust hose are plainly visible as are the four rusty pairs of spots where the engine sat.
With the engine is out, we removed the diesel return line and retrofit something appropriate. The vent line was replaced at the same time. Even two years later, it is still possible to squeeze minute amounts of diesel out of the foam surrounds from the time that the diesel vent spilled diesel into the engine compartment.
We elected to paint the whole section (and the ID of the hole) with epoxy to ensure watertightness.
Best Estimate for Time Required:
| Retrofitting the drain system (buy parts, adjust, install) | 3 hours |
|---|---|
| Move/Reinstall/Test Engine (to access hydraulics) | 4 hours |
| Remove/Repair/Reinstall Hydraulic Pumps | 5 hours |
| Flush/Test Hydraulic System | 5 hours |
| Remove/Repair/Reinstall/Test Alternator | 2 hours |
| Remove/Repair/Reinstall/Test Starter | 4 hours |
| Drive/Ship/Receive Parts | 3 hours |
| Total | 26 hours |
|---|

