Installing a new Furnace
So now that we satisfied ourselves with the new hatch, the time came to install a new heater. While Espar/Eberspaecher heaters are nice, they are also more expensive than the equally German Webasto competition. While the Espar unit has a stainless heat exchanger, the Webasto makes do with a cast Aluminum one. I think either would serve their purpose, and I liked the support I was getting from Sure Marine in Washington State. Hence, I chose a Webasto Airtop 5000
Now that we had ensured that our next furnace would not meet the same fate as the Prout Catamarans installed Espar unit, we could get to work on installing our new furnace. However, before we could begin installation we had to clear out the old infrastructure and make way for the new.
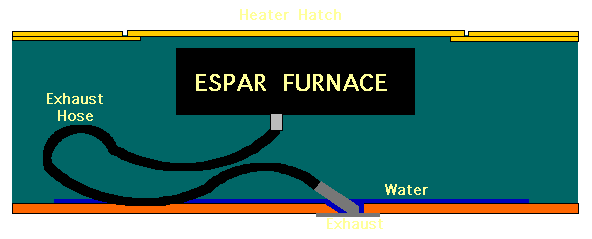
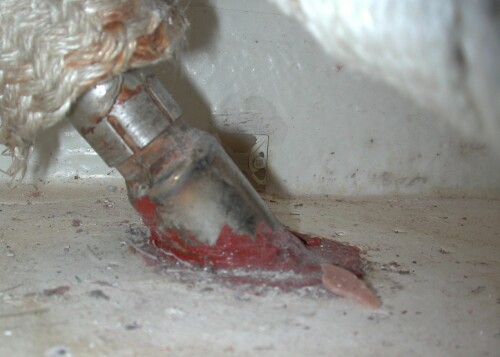
In theory, we should have been able to re-use much of what had been installed by Prout Catamarans: Ducting, diesel supply line, etc. Then we discovered that Prout had installed no diesel filter and that supply line was made of plastic instead of copper. None of the ducts running through unoccupied compartments were insulated. Our immediate attention though focused on the floor underneath the heater hatch. Since the heater exhaust port had been installed right under the furnace in the center of the space, the exhaust port had been hidden from our view by the furnace. When we removed the furnace, we discovered the crude installation of our furnace exhaust
Like the furnace above, the port had been installed directly under the leaky heater hatch. Given that the Espar exhaust used was meant for angled surfaces, the installation on a flat surface required a large oval hole. This hole was left completely unfinished (!!!) with crudely cut balsa core plainly visible between the torn fiberglass layers.

Given the leaky heater hatch and the horizontal installation of the exhaust port, water puddled into the hole, then seeped into the balsa core between the two fiberglass layers that make up the skin of the boat. We elected to scrape out what we could with a screwdriver and strengthen the rest via underwater epoxy (Git-Rot) applied through pilot holes from above. How much of the balsa core was/is saturated will remain a mystery. But the core around the exhaust port is now solid epoxy. The port itself is sealed in place with high temperature silicone. So even if water makes it into this space, the balsa core reinforcing the rear of the boat should be protected.

In an absolutely dry environment, this pathetic and sloppy installation mentality by Prout Catamarans would be but a cosmetic problem. Most builders in the marine industry pride themselves on the little details that keep boats reliable. Why else employ tinned wiring, drip loops, water locks, etc.? Even behind a circuit breaker cover panel, installers assume that water and/or condensation could find its way in. This eye for detail was sorely lacking by the folks who built our Prout Escale.
Besides the before mentioned hatch design and exhaust installation mentality, it would also explain why the hot flexible heater exhaust hose was left to slide around as it pleased in a space with rubber hoses and fixed ABS air pipes for the engine. Going forward we will also fix all the hoses in place so that no movement can occur. The exhaust line itself is quite long (to match the intake) and now covered with several layers of high temperature glass fiber socks. As the exhaust was made of stainless material we were able to re-use it, along with all of the ducting that was installed throughout the boat.
The manual that Sure Marine sent along with the AirTop was very, very comprehensive. It is written for competent installers or do-it-yourselfers and details every step along the way. Everything is covered, including any shortcuts that someone might contemplate. Obviously, this 50+ page treatise was born out of many support calls. This tome by itself is a good reason to choose Sure Marine. Once I had read, understood the entire manual, the time came to install the heater.
Given the excellent manual and the comprehensive set of accessories we had accumulated by now, the installation itself was quite quick. We mounted the control unit next to the furnace and attached the unit directly to the house bank. Since it has a built-in circuit breaker this is permissible. Furthermore, severe damage could result if the heater is shut off in the midst of going full blast. We then ran the control wiring to the same spot in the saloon where the Eberspaecher/Espar controller used to be. While the Espar controller needed two hole cutouts, the Webasto unit incorporated all features into one control box. Thus, we have a round cutout we'll have to fill at some point. No big deal...

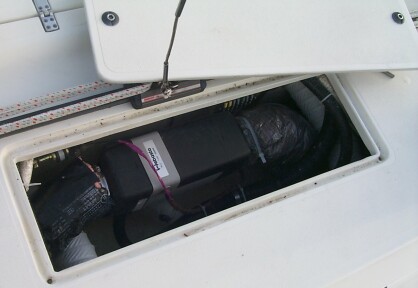
The finished frame with the routed channel has been painted and has "disappeared" into the deck. While the hatch doesn't have a exact curvature match, at least the surface of the hatch can perfectly mimic the surface of the underlying hull once the dogs have been tightened down. Our heater looks pretty happy and is bone dry despite some heavy downpours.
We tested the system and much to our relief, it works great. One does have to be careful with the ducting though, as mismatches can make the blower blades scrape against the surrounding plastic. Furthermore, we discovered how loud a little "click" pump can be. After suspending the pump as recommended the magnitude of the click noise dropped. The clicks are a small price to pay for the wonderful warmth the Espar adds to our cabins.
Conclusion
But why would Prout install a heater as shoddily as they did in the first place? I think they were rushed. They had to get the boat to the US, even though it was months behind schedule and unfinished. Corners were cut in order to meet an already delayed delivery date. Things were installed as quick as they could go in, perhaps even with the thought of revisiting them later.
Let's review together:
- Prout installed a hatch that nobody could reasonably expect to keep the elements out. According to our master plan, this hatch is usually the cover for the steering systems hydraulic ram. Not only did this hatch cause our rear crash compartments to flood: No provisions were made by Prout to empty them either.
- Subsequently, a $3,000 heater lasted for two years before rust neutralized it. Given the real risk of high dollar lawsuits in the US due to carbon monoxide poisonings, I am surprised their US distributor let them get away with it. Then again, the then distributor (Doug Zeisler) was a one-man operation, while the current distributor Advanced Yachts is more vigilant.
- The installation of this heater was simply shoddy. From the unfinished exhaust port hole to the lack of any fuel filters, the unit was installed with an utter disregard of accepted marine installation standards. Perhaps they were rushed initially but they certainly had enough time later on to make everything right.
Given that Advanced Yachts wouldn't allow Prout to do any wiring at one point makes me hope that AY avoided similar mishaps in other sections of imported boats. Furthermore, there is always the possibility that later boats did not feature the same idiotic heater hatch design found on ours. Well, we can hope anyway.
Best Estimate of Time Required:
| Inspection after initial complete removal of Espar parts | 1 hour |
|---|---|
| Drill access holes to core, buy and apply Git-Rot, refinish surface, paint | 3 hours |
| Remove balsa core around exhaust hole, fill hole w/epoxy, redrill | 3 hours |
| Reinstall exhaust system, insulate w/additional fiberglass socks | 1 hour |
| Install diesel pump, breaker system, controls, furnace, insulate ducting | 3 hours |
| Test system | 0.5 hours |
| Total | 11.5 hours |
|---|

