


You don't have to put on the Red Light...
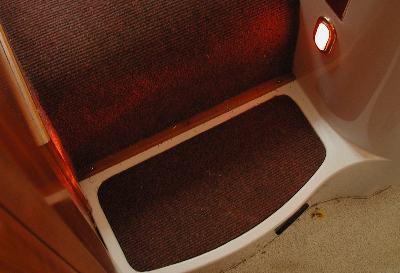 Our Prout Escale Catamaran came with two nightlights that were fitted to illuminate the stairs where the hulls transition to the center. Both lights featured thick red, textured glass covers and a 10W bulb to still provide enough light. Such a load was unacceptable for us to leave on at night, so I investigated around the internet for other options.
Note: At the time, none of the plentiful, ready-made LED-based lighting solutions available today had made it to market yet. If I were to do this project again starting today, I may have considered buying something instead of fabricating it myself.
One of my luckier finds on the internet were Don Klipsteins LED archive and Craig S. Johnsons LED Museum. If someone has tried it, you can find it there. They also offer a good introduction to LEDs, links to enthusiast sites, etc. Both sites do a great job of discussing the advantages and pitfalls of LED illumination. As with many other things in life, LEDs currently have their place for specific applications, while being unsuitable for others.
For instance, most LEDs sold today do not approach the efficiency of Fluorescent, Halide, or even incandescent lights of turning watts of energy into lumens of light. I know this sounds like heresy considering the marketing literature from LED outfits. However, LEDs are very interesting solid-state devices:
- They are inherently more focused than other solutions (i.e. the light goes where you want it to go) and typically do away with reflectors.
- LEDs usually emit light in a very narrow spectrum - you get the light you want, nothing more. Incandescent sources have to be saddled with very inefficient filters and thus lose a lot of lumens of light when any color but white is desired.
- They do not lose their luminesce nearly as much as incandescent bulbs as voltage drops - good news for battery users.
- LEDs achieve maximum efficiency at a much smaller size: Incandescent bulbs used in small devices like flashlights are usually not very efficient.
- Most LEDs last 100,000 hours under normal circumstances, 10x or longer than incandescent.
- As LEDs are usually used in clusters, the failure of any one LED does not cause the lighting system to fail outright: Instead, it degrades slowly.
- One of the maddening aspects of LEDs is their uneven brightness and internal impedance. The uneven brightness is no great concern for tinkering, but the uneven impedance can easily make life difficult in terms of power distribution and LED longevity.
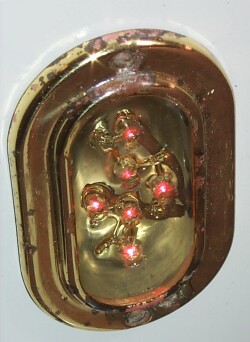
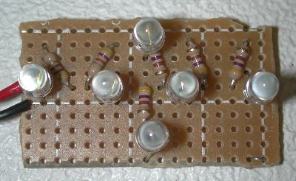
Here is a picture of my first replacement for our two "night" lights on the stairs that lead to the saloon area. I have substituted a clear ½" thick Plexiglass sheet for the red glass. The six high-efficiency LEDs provide 6 candles worth of light each, so this array is plenty bright. In its current incarnation, it draws about 0.12 Amperes instead of .9 Amperes, a 8-fold improvement.
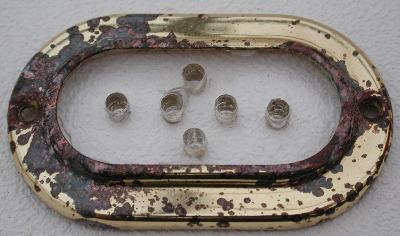 To make it, I started with some junked Plexiglass at work that was cut to rough size using the old insert as a guide. A belt sander then provided the finishing dimensional touches before I drilled the hole pattern. Each hole is 5mm wide, so that the LEDs are seated in a near press-fit. Once everything was ready to go, I glued the plexiglass into the brass form.
Then I sealed everything with polyurethane. The polyurethane provides a crystal clear finish and even hides scratches. I kept the internal reflector that came with the brass lamp as it was required for mounting purposes. And yes, if I had cared, I could have removed the terrible oxidation from the brass first... details that I'll leave for the day that I have too much time on my hands.
The 180HSP LED's are made by AND were purchased at Allied Electronics. I tried three different lighting options before coming to the solution I use today.
1. Wire 6 LEDs in series.
In theory, this is the most energy-efficient solution - no power is wasted in a resistor or other voltage/current regulating device. The only problem is that LEDs don't like high voltages (they get hot and either the heat or a small vibration can then destroy them).
The typical voltage on board is somewhere around 12.5 Volts. Each HSP180 LED is optimized for a voltage drop of 2.1Volts. Thus, wiring six of them in series seemed like a good idea - as long as you don't turn them on while the engine and hence the alternator are running. During charging, our voltage approaches 14.2 Volts, which means about 2.33Volts per LED.
This difference doesn't sound like much but is enough to kill the LEDs, particularly as the low-impedance LEDs grab more power than their neighbors and thus will overheat faster. Worse, a single LED failure makes the whole string go out (like Christmas tree lights). Hence, most tinkerers do not use a simple string of lights unless they can control the voltage and the LEDs have been matched for each other.
So, this approach was scrapped after the first test subject died a early death under real-life conditions. Most likely, it was a combination of high voltage and vibration that caused the failure.
2. Use a voltage regulator or DC-DC power supply.
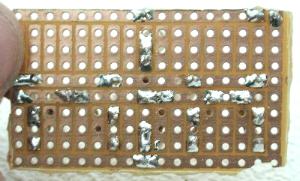
This promised to be a elegant solution to ensure that the LEDs always got the voltage/current levels they wanted, regardless of the system voltage on board. However, there is a catch: Most voltage regulators do not supply 2.1VDC as these LEDs require, and even those that do are not very efficient at it. Here is a prototype board I developed.
The etched circuit at left basically takes power from the input terminal to the fuse holder. From the fuses, the power goes to two identical circuits who have a small 150mA rated, 2.1V voltage regulator that is supported by a pair of tantalum capacitors each. I figured such a regulator would be perfect since six 180HSP LEDs consume about 120mA when wired in parallel. Even better, any LED failure would have no effect on fellow LEDs or the voltage of the circuit.
Well, I discovered that even low-power voltage regulators require relatively large heat sinks to achieve anything near nameplate capacity. Commercial operators achieve this through very careful etching and using as much copper on the motherboard as possible around the voltage regulator to dissipate heat. As you can see from the picture, I didn't leave much copper and the resultant power capacity was more like 40mA.
Thus, I abandoned this approach. Not only was it more complicated than I would have liked, the power efficiency wasn't there either. A more powerful circuit built using an adjustable Radio Shack voltage regulator pulled 300mA, more than if I simply put individual resistors in front of the LEDs! Learning how to etch my own circuit boards using the Radio Shack kit was interesting, however.
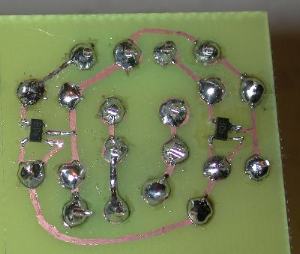
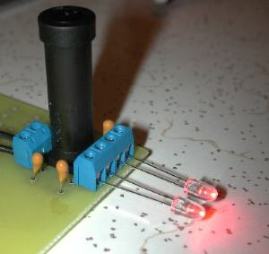
3. Keep it Simple, Stupid: Individual Resistors
There are good reasons why most incarnations of LEDs out there simply use a drop-down resistor in conjunction with an LED: It's dirt simple, cheap, and it works.
The circuit board was purchased at Radio Shack and modified with pliers to fit into the night-light enclosure. As you can see, each LED is fed by a individual resistor that derives its power from a central bus in the center of the board. These resistors are the 460Ω variety typically found in Radio Shack stores. They work reasonably well, though I typically use 530Ω resistors to be on the safe side. Considering the extremely low power requirements, even 1/8W resistors will do (if you can find them).
This completed my quest for good nightlights at the steps. However, there is some space to traverse to get to the bathrooms. Hence, I decided to also build long light strips to be mounted on the kick-boards in the navigation and kitchen areas. I started with 1/4" by 1" strips of acrylic (from McMaster Carr) to mount the LEDs in. However, I found the strips to be too brittle and very fragile.
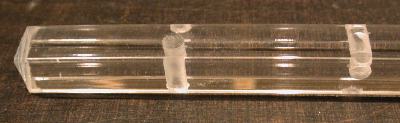
Later versions are made of ½" square acrylic, which is much more resistant to breaking. The above picture shows the end with a thru-hole for mounting via a screw and another to the right for an LED. Below, is a picture of the results.
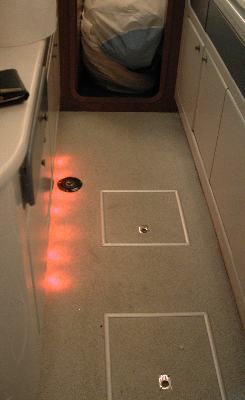
At night, this array of lights does a great job of lighting the floor area and (though somewhat faintly) the rest of the main saloon. It does not interfere with night vision, and it gives great warning in case something fell on the cabin floor... or, if the salt-water pump for the galley sink (the black circle in the picture at left) popped up unexpectedly...
Each LED is mounted to a small breadboard consisting with a resistor wired in series. These breadboards were derived from a larger PC board that Radio Shack makes (part number #276-150) using a razor knife and pliers to break the board into smaller pieces. Each LED breadboard is a 3x3 matrix to allow for the bus wires (4 pins), the resistor (2 pins), and the LED (2 pins).
I am somewhat surprised to see how long it has taken boat manufacturers to embrace LED lighting technology - even as an extra. While "White" LED's are not as efficient at producing light as regular light bulbs, the red varieties can excel well beyond the efficiency levels of white light filtered to produce red. For instance, to date I know of only one OEM navigation light manufacturer to offer LED bulbs.
Even though white LEDs are not very efficient, they have found their niches in applications such as spot lighting where their cool white light poses no environmental hazard to the object being lit (in museums for example where the heat from conventional lights can be a real problem inside display cases). Similarly, white LEDs can be very useful for reading lamps where people want to avoid the potential "ouch!" problems associated with halogens.
Best Estimate for Time Required:
Oval Night Lights:
| Find, buy parts | 5 hours |
|---|---|
| Drill holes in acrylic, shape acrylic to fit enclosure, install in enclosure | 2 hours |
| Install, test LEDs | 0.5 hours |
| Install, test Voltage Regulators | 10 hours |
Light Strips:
| Build new light strips, wire, install LEDs | 4 hours |
|---|---|
| Install in boat, wire to existing lights | 0.5 hours |
| Total | 22 hours |
|---|