How to strangle an Engine
In the course of our propulsion project we also discovered that the engine is not being fed enough supply air to function properly. This is another result of the Prout Catamarans seat-of-the-pants design process. For if Prout Catamarans had consulted readily available technical literature, they would have discovered that the air supply for our 60hp engine was much smaller than the Perkins specifications called for.
The decision to use the same ABS pipe for supply air in our boat may have been driven by habit. After all, Prout Catamarans usually installs engines no bigger than 30 hp or so in its sailboats. Thus, what may have been perfectly adequate for the "normal" range of engines was another detail that was overlooked on our Prout Escale.
In fact, the air supply was at least 50% smaller than the smallest vent opening recommended for temperate climates
(hotter climates would be even more detrimental to engine performance).The net pressure drop and air resistance was further aggravated by the small diameter pipe that delivered the air from the rear compartment to the engine. We lost 200-400 RPM this way, a full 10% of engine power. This may not sound like a big deal, but it made the engine labor harder, to its detriment. There is a easy test to figure out if your engine is strangled too:
- Warm up engine
- Open Engine Hatch
- While in neutral, rev. engine to max, note max. RPM
- Now close hatch, rev. engine again, note max. RPM
If the maximum RPMs your engine can reach under no-load are not the same, then you have a constricted air supply. You may want to repeat the same excercise under load, since a restricted air supply only makes matters worse. Thus, find a nice open stretch of water, engage the propellers, open the throttle wide open, then modulate the engine hatch to see if the RPMs change or if the soot shooting out the rear is decreasing.
If you think that this is an isolated incident, I would like to point out that a Prout Panther owner described how his engine compartment lacked proper ventilation so that the supply air was pulled in part from the living compartments. That's pretty scary when you consider that fumes can go both ways. Carbon Monoxide poisoning is a very real danger under those circumstances.
Back to our constricted air supply. Here is a sketch of the air supply as installed by Prout Catamarans: six feet of 2.125" diameter ABS pipe routes the air from the rear platform through two spaces and into the engine compartment. Overall, not a bad installation, except that the ventilation requirements of the engine are not satisfied by a long shot according to the Perkins, engine manufacturer.
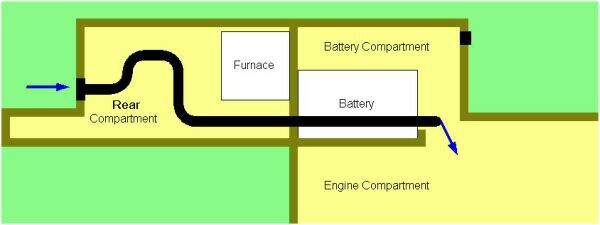
Cross section through the rear of the boat. Green spaces are external.
An inquiry to Perkins revealed that a M60 in a temperate climate should have a duct diameter of at least 16 square inches. In a hot climate, the duct diameter recommendation grows to 32 square inches. The ABS pipes installed by Prout Catamarans weigh in at 3.5 square inches per pipe, for a total of 7 square inches of intake area. These 6 foot long pipes also go through all sorts of convolutions to keep out water - further restricting air flow by increasing pressure drop. Perhaps this is why the cockpit drain was not connected to go overboard and drained into the engine compartment instead - did Prout Catamarans intend this to be an air intake???
Perkins also indicated that the minimum combustion air flow for the engine was 106 cubic feet per minute (CFM). Ideally, the engine would receive 247 CFM of air for combustion and ventilation. The 32 sq. inch cutouts required for proper passive ventilation would be bigger than I would be comfortable installing in the rear of our Prout Escale. Given the history of structural deficiency, I didn't want to add any further weakness in the hull. Furthermore, the furnace and the batteries stood in the way of the identical 32 sq. inch cutout we'd want to install into the wall between the rear compartment and the battery/engine compartment.
Given these restrictions, we needed to employ active air circulation to fulfill the 250 CFM air requirements of the engine. I like the design of the Attwood 4000 Turbo blowers. Under our circumstances each will deliver about 125 CFM of air flow. Luckily, there was enough space in the battery compartment for the blowers and the AGM batteries. Note the localized fusing in addition to the circuit breaker at the source of this electrical circuit.

This location affords easy access and verification of blower activity. At 4.4 amperes each, the blowers absorb 8% of hot alternator capacity (106A) but may cool the alternator enough to let it run closer to its cold capacity (125A). Better cooling for the alternator may become mandatory as the charge acceptance of the AGM batteries we've installed will easily max out the alternator.
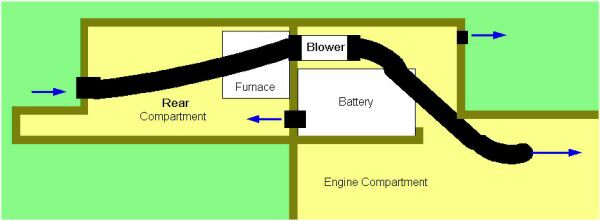
This design allows more air to circulate in the rear compartment which may help us with moisture. Each blower is configured to run only with the engine on and is fused separately.
Once we had installed the blowers, our engine was able to rev 200-400 RPM higher than it could before under no-load, while loaded performance improved remarkably as well. Evidently, the air restriction had held back our engine when it was hunkering down driving both propellers. While the improvement was not enough to avoid the need to upgrade the hydraulic system, it is a step in the right direction. The only criticism I have for the blowers is the noise - they were the loudest thing you could hear in the rear cabins when the engine is idling until we dampened their mounting.
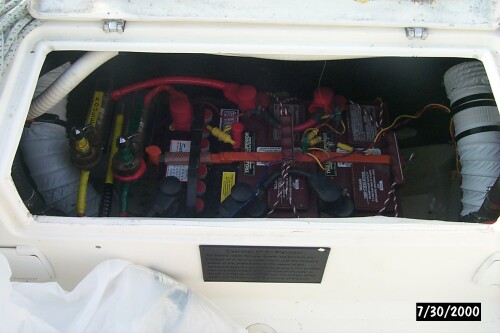
The positive side effects have been remarkable. Because the entire engine compartment is now pressurized, the air escapes through the battery vents in the cockpit. The warm engine air tends to dry everything in the compartment as it escapes. Thus, the current tendency of this compartment is to dry out and remain that way. Here then is a view of the battery compartment with the two blowers installed (left and right). In the middle are our former three group 31 batteries as well as all the gear required to monitor them.
For now, we have left the former 3" diameter holes in the bulkhead between the batteries and the rear compartment. The blowers create enough pressure to force air past the built-in bookshelves in the rear compartments... So we'll either have to install external vents into the rear compartment or seal up the holes in the bulkhead.
Last but not least, I decided to install a RC circuit to keep the blowers running a bit longer after the engine was shut down. This is to ensure that the alternator is cooled somewhat after coming to a stop.
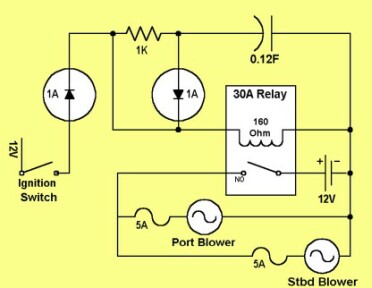
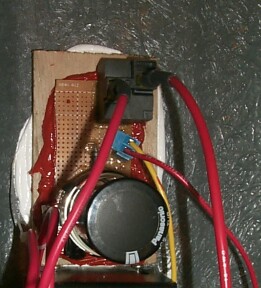
While the engine is running, the capacitor is getting charged slowly (it takes about 5 minutes). The resistor ensures that the current running across the switch contact is limited to safe levels. The diodes in the above circuit ensure that the energy stored in the capacitor only flows into the relay. Otherwise, you end up powering other paralell circuits once the engine switch has been turned into the "off" position.
When the engine is turned off, the capacitor discharges through the relay coil and keeps the blowers running for an additional 30 seconds. The only expensive part was the 0.12 farad 16V capacitor - $14! This timing circuit is mounted in the electrical closet next to the bilge connectors.
Some readers have recommended using a 555 IC-based timing circuit to achieve the same functionality without the capacitor and at lower cost. However, my training in electrical engineering didn't proceed to IC circuit design, so a simple RC circuit is the ticket for me.
Best Estimate of Time Required:
| Test engine performance w/and w/o engine hatch open. Notice discrepancy | .25 hours |
|---|---|
| Confer w/Perkins re: recommended air intakes for Perkins engine | 2 hours |
| Research blower options on internet, settle on Attwood blowers, order | 4 hours |
| Buy misc. stuff required for blowers, select installation location | 1 hour |
| Drill new holes for air ducting, attach new air ducts, blowers, wire up | 2 hours |
| Continue installation in engine compartment (route duct to alternator, intake) | 1 hour |
| Install wiring in Link Box, etc., test blower system | .25 hours |
| Design circuit, select proper relays, capacitors, etc. then order | 2 hours |
| Build breadboard, test system | 0.5 hours |
| Install breadboard in boat, test | 0.5 hours |
| Total | 13.5 hours |
|---|


